
Overgrown hooves can be uncomfortable, painful, and even cause serious health problems for your horse. Farriers recommend trimming hooves every 4 to 6 weeks to keep your horse happy. Traditionally, hoof trimming was strictly left to experienced farriers, given the intricacy of this task. Cutting the hoof too low can injure the soft tissues, causing your horse to limp or, even worse, become lame.
With the availability of better tools, horse owners can trim their pony’s hooves. That said, you need to be extremely careful to avoid unnecessary injuries. If this is your first time, you will find this article helpful. I will show you step by step how to trim horse hooves. I have also included some extra tips to help you get the most from this project.
So, let us get started!
You will need:
- Gloves
- Rasp
- Nippers
- Hoof Knife
Step-by-Step Guide on How To Trim Horse Hooves
Follow these steps to trim your horse’s hooves the right way.
Step 1: Moisten the hooves
Hooves can be quite tough and even tougher to trim when they are dry. Soaking makes trimming easier, and you are less likely to injure your horse.
Place a basin filled with water underneath the horse’s feet and soak for 20 to 30 minutes, depending on how dry the hooves are.
Pro Tip: Get your horse something to do to keep him from becoming bored and fidgeting. For example, avail some hay your horse can nibble on.
Step 2: Position the horse’s leg
You and your horse should be comfortable for a successful trimming session. Never attempt to trim your horse’s hooves when he is kicking or clearly uncomfortable. This can result in serious injury both to you and the horse.
To get started, hold the front leg, lift it up and gently push it back so that his knee rests on his chest and the hoof points out.
Then, in this position, place the horse’s leg in between your knees. Use your knees to hold the leg in position. The hoof should now face you, giving you a good view of all the parts, including the wall, white line, sole, and heel. It is important to view the entire hoof to avoid trimming unevenly or hurting your horse in the process.
A common mistake I see with beginners is lifting the leg up and then pulling it out. But, this is incredibly uncomfortable even for a fit horse. Aim to bend the leg using the natural joint movement. Moving closer to the center will also help avoid pulling the leg out and placing unnecessary strain on it.
I recommend watching this video to learn how to correctly position the horse’s leg, regardless of age or fitness level.
Step 3: Clean the hoof
Soaking also makes it easier to clean the hooves. You must first remove stuck mud and soil to get a good view of the anatomy of the hoof and determine much you will need to shave off.
Once you get into the correct position, cleaning and trimming will be a bit easier.
To get started, bring out your hoof knife. Hold the knife with your folded fingers facing you and the hook pointing inward.
Hold the horse’s leg in one hand and use the other hand to clean the hoof with the hoof knife. Depending on how dried in the mud and dirt is, you may need to make several passes before the hood is reasonably clean.
Use the sharp hook to scrape inside and around the bars and frog areas of the hoof where dirt, mud, and other debris like to hide. Extra force is unnecessary, but you will need a steady hand to get at the stubborn dirt stuck in the mud. As usual, be careful not to puncture and sore the hoof with the hoof knife as you lift out the dirt.
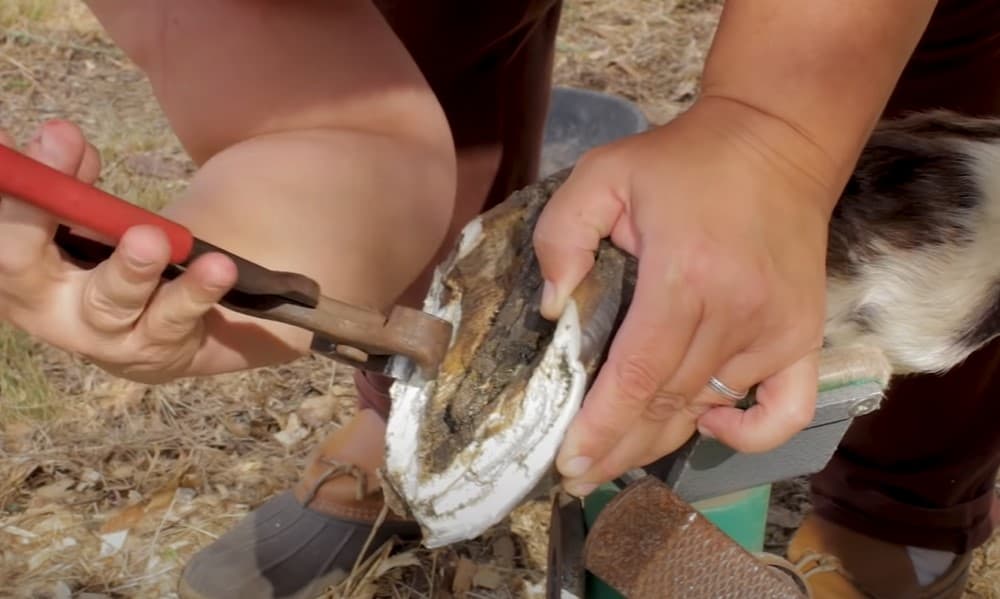
Step 4: Cut off the overgrown outer hoof wall
Trimming horse hooves really is about paring down an overgrown hoof wall. The rate at which the outer wall grows will depend on several factors such as age, fitness, overall health, and the horse’s level of activity.
The wall might grow faster in younger and healthier horses. But, an inactive horse that spends most of his time in the stable can also have overgrown hoofs compared to a horse that is out and about, whose hooves grind against the ground often.
To clip this outer wall, you will need nippers. Ensure that your pair of nippers is sharp enough so you can easily remove the excess hoof wall.
Hoof nippers work like nail cutters—just place the teeth of the clippers along the edge of the wall and apply the due pressure to clip off the hoof wall. Do this all around the entire hoof, from one shoulder of the heel to the other shoulder.
Aim to clip off the wall to a reasonable level. Don’t go too low as you might end up digging into the sole sensitive tissues and, in the process, hurt your dear horse. Keep the clippers flat with the handles pointing at you. You will avoid trimming at awkward angles, allowing you to keep the walls straight.
Step 5: File down the hoof wall
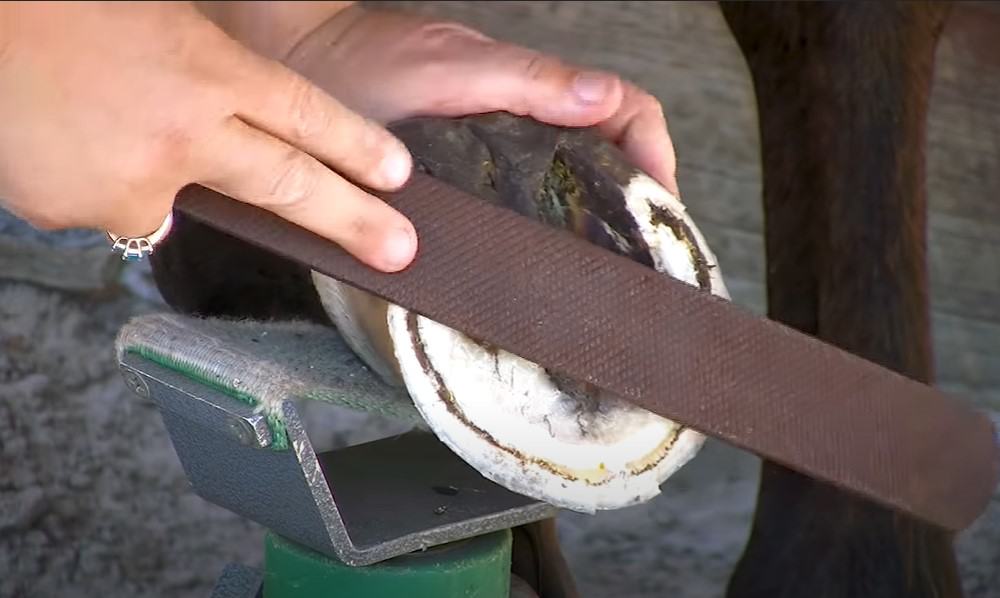
The nippers can cause unevenness along the hoof wall. A metal file, also known as a rasp, will help you even out any jagged edges.
In the end, the horse’s hoof should be flat around the outer wall, heels, and at the center. Any high points on the hoof will cause the horse to limp and exert weight on these points, resulting in soreness and, possibly, lameness.
Using short and soft strokes, move the rasp across the hoof, targeting uneven spots. Work slowly, being careful not to file the sensitive sole and frog areas. Use the white line in the hoof as a guide to ensure that you are rasping only the safe zones.
Check the heels for any unevenness. Don’t drag the rasp across both heels at the same time. Instead, identify the higher of either heel and file it down to the other’s level.
Step 6: Cut dead flesh on the sole and frog

Now that you have clipped, filed, and made the hoof wall even, it is time to move on to the inner part of the hoof. The sole and frog areas usually develop tough dead skin after a while, making the horse’s hoof and steps uneven.
Use a hoof knife to cut off the top layer of the tough dead skin. Again, be moderate, carefully trimming just the top part. Inspect the sole after each trim. If it feels soft to the touch, you are getting close or are at the soft tissue, a sign that you have trimmed the sole enough. Going deeper than this will bruise your horse and possibly lead to serious problems.
I like to use the rasp file to check for evenness. Place the file across the hoof and identify any spots that need to be leveled down. Inspect the hoof one last time, ensuring that both heel shoulders are flat, the sole and frog are level, and the outer wall is even and smooth.
That’s it! Congratulations on trimming your horse’s hoof. Check out the quick tips below to help you improve your hoof trimming skills.
Extended Tips
- Trim one or two horses per session. It might be tempting to trim all the hooves at once, but this can be tiring fr both you and your equine pal. I recommend trimming one hoof a day for the best results.
- When trimming, aim to make the outer wall have at least a 60-degree angle. The horse will have a comfortable foot at this angle and avoid putting much pressure on one side.
- Tune into your horse’s emotions as you attempt to trim his hooves. Generally, horses don’t like being touched or loud sounds, so before lifting your horse’s leg to trim the hooves, ensure that he is comfortable in this position.
- If you notice any injuries on your horse’s hoof, consult with your veterinarian immediately. A small cut or bruise can easily get out of hand.
- Always use adequately sharp tools when trimming horse hooves. This will make your work more efficient and reduce the chances of injuries.
Summary
Trimming sessions can be a great time to bond with your equine buddy. The secret to a successful trim is to keep the hooves steady to get a good view and identify the spots that need work. As always, be patient with your horse, even when he seems anxious. You will build a bond of trust, and he will be calmer during his hoof trimming sessions as time goes by.


